Title: How to Prepare Pork for Pulled Pork: A Comprehensive Guide
I. Introduction
Get ready to embark on a mouthwatering journey to the perfect pulled pork paradise!
In this comprehensive guide, we’ll walk you through every step of how to prepare succulent, tender, and flavorful pulled pork for a big group.
Also, read here for the optimum pulled pork serving size.write a catchy sentence on side dishes for pulled porkwrite a catchy sentence on side dishes for pulled porkwrite a catchy sentence on side dishes for pulled pork
The importance of proper preparation when making pulled pork cannot be overstated.
Paying attention to each step in the process, from cutting to applying the perfect seasoning blend, is crucial to achieving that irresistible, melt-in-your-mouth tenderness and rich, smoky flavor.
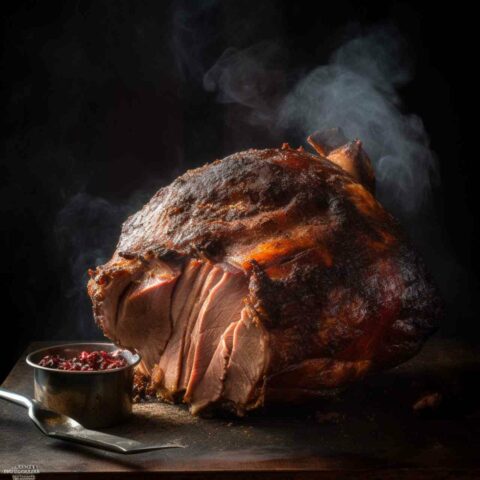
I. Choosing the Right Cut of Pork to Buy
“Unlock the Secrets to Perfect Pulled Pork: How to Choose the Right Cut of Pork for Mouthwatering, Tender Results”
II. Trimming and Prepping the Pork
Removing Excess Fat: Proper fat removal is essential for achieving the perfect balance of flavor and texture in pulled pork while avoiding an overly greasy dish.
Importance of fat removal:
- Balancing flavor and texture: Trimming excess fat helps preserve the rich taste of pulled pork without compromising its mouthwatering tenderness or causing dry meat.
- Avoiding overly greasy pulled pork:To much fat can overwhelm the pork taste.
B. Techniques for trimming fat:
- Using a sharp knife: A sharp knife allows for precise and efficient fat trimming, making the process safer and easier.
- Maintaining proper thickness: Carefully trim the fat while leaving a thin layer to provide moisture and flavor during cooking.
- Discarding removed fat or saving for other uses: Choose to discard the trimmed fat or save it for rendering and use in other recipes, such as making lard or adding flavor to other dishes.
Review Of the Top 5 ways to cook pulled pork for a party.
III Scoring the Meat: Scoring the pork’s surface enhances seasoning penetration:
A. Benefits of scoring:
- Scoring allows seasonings to seep deeper into the meat, ensuring a more flavorful and robust pulled pork.
- Improved tenderness: By breaking down muscle fibers through scoring, the pork becomes more tender and easier to pull apart after cooking.
- More even cooking: Scoring contributes to consistent heat distribution, helping the pork cook evenly and preventing undercooked or overcooked areas.
B. Scoring techniques:
- Shallow cuts in a crosshatch pattern: Create a crosshatch pattern by making shallow, evenly spaced cuts across the meat’s surface, which allows for optimal seasoning penetration and tenderness.
- Spacing and depth considerations: Ensure consistent spacing and depth while scoring to maximize the benefits and maintain the meat’s structural integrity.
- Safety precautions while scoring: Always use a sharp knife and exercise caution during the scoring process to avoid accidents and ensure precise cuts.
IV. Marinating and Brining:
Enhance the flavor, tenderness, and juiciness of your pulled pork by incorporating marinating and brining techniques into your preparation process.
A. Purpose of marinating and brining:
- Flavor enhancement: Both marinating and brining infuse the pork with additional flavors, creating a more complex and delicious final product.
- Increased tenderness: The acidic components of marinades and the salt content of brines help break down muscle fibers, resulting in a more tender pulled pork.
- Improved juiciness: Brining, in particular, allows the pork to absorb moisture, ensuring a moist and juicy pulled pork dish.
B. Popular marinade and brine recipes:
- Traditional BBQ marinade: A combination of ketchup, apple cider vinegar, Worcestershire sauce, brown sugar, and spices for a classic barbecue flavor.
- Citrus-herb marinade: A blend of citrus juices, olive oil, garlic, and fresh herbs for a bright and zesty profile.
- Simple saltwater brine: A basic mixture of water, salt, and sugar, which can be customized with additional herbs and spices.
- Apple cider brine: A flavorful brine made from apple cider, water, salt, sugar, and a mix of spices, perfect for adding a subtle sweetness to the pork.
C. Marinating and brining timeframes:
- Marinating: For optimal flavor, marinate the pork for at least 4 hours, or ideally overnight, to allow the marinade to penetrate the meat.
- Brining: Brine the pork for at least 8-12 hours, or up to 24 hours for larger cuts, ensuring the meat is fully submerged in the brine solution for even flavor absorption.
V. Seasoning the Pork:
Elevate the flavor of your pulled pork by using dry or wet rubs, both of which provide unique taste profiles and textures.
A. Dry rubs:
- Ingredients and preparation: Dry rubs typically consist of a blend of spices, herbs, and sugars, which can be customized to your taste preferences. Common ingredients include paprika, brown sugar, cumin, garlic powder, onion powder, chili powder, and salt. Combine the ingredients in a bowl to create a uniform mix.
- Applying the rub: Generously coat the entire surface of the pork with the dry rub, pressing it onto the meat to ensure it adheres properly. Allow the seasoned pork to rest for at least 30 minutes, or preferably a few hours, to let the flavors penetrate the meat.
B. Wet rubs:
- Ingredients and preparation: Wet rubs are similar to dry rubs but include wet ingredients, such as oil, vinegar, or mustard, to create a paste-like consistency. Mix the wet ingredients with your choice of spices, herbs, and sugars, creating a blend that complements your desired flavor profile.
- Applying the rub: Spread the wet rub evenly over the pork, ensuring complete coverage. As with dry rubs, allow the seasoned pork to rest for at least 30 minutes, or up to a few hours, to maximize flavor absorption before cooking.
VI. Cooking Methods and Techniques
This step is key, and requires its own article, which is being written at the moment and coming next.
A. Slow cooker B. Oven C. Smoker D. Instant Pot E. Comparing cooking times and temperatures
VII. Ensuring Moist and Tender Pork:
Guarantee a juicy and tender pulled pork dish by carefully monitoring the internal temperature and employing moisture-retaining techniques during the cooking process.
A. Monitoring internal temperature:
- Ideal temperature range: For pulled pork, aim for an internal temperature of 190-205°F (88-96°C), which ensures the collagen and fat have broken down sufficiently to create a tender, easy-to-shred texture.
- Using a meat thermometer: To accurately track the pork’s internal temperature, insert a digital meat thermometer into the thickest part of the meat without touching the bone. Regularly check the temperature to avoid overcooking or undercooking the pork.
B. Basting and other moisture-retaining techniques:
- Basting: Periodically baste the pork with its own juices or a flavorful liquid, such as apple juice or broth, to keep the surface moist and promote even cooking.
- Foil wrap: When the pork reaches an internal temperature of 170-175°F consider wrapping it in aluminum foil to lock in moisture and expedite the cooking process.
- Resting the meat: After reaching the target internal temperature, remove the pork from the heat and let it rest for at least 1 hour before shredding. This allows the juices to redistribute within the meat, resulting in a moist and tender pulled pork.
IX. Saucing and Serving Pulled Pork:
Complete your pulled pork masterpiece by selecting the perfect sauce, incorporating it into the shredded meat, and pairing it with complementary side dishes.
A. Popular sauce options and recipes:
- Classic barbecue sauce: A sweet and tangy tomato-based sauce that complements the smoky flavor of pulled pork, with variations including regional favorites like Kansas City, Memphis, and Texas styles.
- Vinegar-based sauce: A tangy, thin sauce originating from the Carolinas, made with apple cider vinegar, spices, and a touch of sugar or honey.
- Mustard-based sauce: Another Carolina favorite, this sauce features mustard, vinegar, sugar, and spices for a zesty and bold flavor profile.
B. Mixing the sauce with shredded pork:
- Selecting the right amount: Start with a small amount of sauce and gradually add more until the desired flavor and consistency are achieved. Avoid oversaucing, which can result in soggy pulled pork.
- Incorporating the sauce: Gently fold the sauce into the shredded pork, ensuring even distribution and a consistent flavor throughout.
C. Serving suggestions and side dishes:
“Dazzle Your Guests with Delightful Pulled Pork Pairings: Discover Flavorful Side Dishes That Elevate Your Barbecue Experience!”
X. Storing Leftovers
Leftover pulled pork can make for delicious and convenient meals in the days following your event. To ensure the safety and quality of your leftovers, it’s essential to store them properly in the refrigerator. Follow these simple steps to keep your pulled pork fresh and ready to reheat:
A. Refrigeration guidelines
- Cool the leftovers: Allow the pulled pork to cool to room temperature within two hours of cooking. Cooling the meat quickly prevents bacterial growth and keeps it safe to eat.
- Divide into smaller portions: To expedite the cooling process and make reheating more convenient, divide the leftover pulled pork into smaller, meal-sized portions.
- Use airtight containers: Transfer the pulled pork into airtight containers or resealable plastic bags to prevent cross-contamination and protect the meat from absorbing odors in the fridge.
- Store in the refrigerator: Place the containers or bags with leftover pulled pork in the coldest part of the refrigerator, typically towards the back. Maintain a consistent temperature of 40°F (4°C) or below to preserve the quality and safety of the meat.
- Consume within 3-4 days: For best quality and safety, consume the leftover pulled pork within 3-4 days of refrigeration. If you’re unsure whether the meat is still safe to eat, check for any off-odors or slimy texture.
By following these steps for storing your leftover pulled pork in the fridge, you can ensure its safety and quality while enjoying tasty meals throughout the week.
B. Freezing Pulled Pork
“Maximize Your Leftover Pulled Pork: Tips for Freezing Safely and For Maximum Shelf Life
XI. Conclusion
A. Recap of the preparation process
When you take the time to prepare your pork correctly, you not only ensure a delicious final result but also create a dish that is more enjoyable to cook and share with loved ones. By mastering the nuances of pulled pork preparation, you elevate your culinary skills and guarantee that every bite will be a memorable and satisfying experience.