Introduction
What Are the Best Cooking Methods for Pulled Pork For A Crowd
Pulled pork is a versatile and mouthwatering dish that can be enjoyed in various forms, from pork sandwiches to tacos.
If you’ve been searching for the best ways to cook pulled pork, you’ve come to the right place.
In this article, we’ll explore the top five cooking methods, complete with recipe overviews, internal temperature guidelines, and tips for adjusting cooking times based on the size of your pork.
“Party Planning Pro: The Ultimate Guide to Serving Perfect Portions of Pulled Pork for a Crowd!”
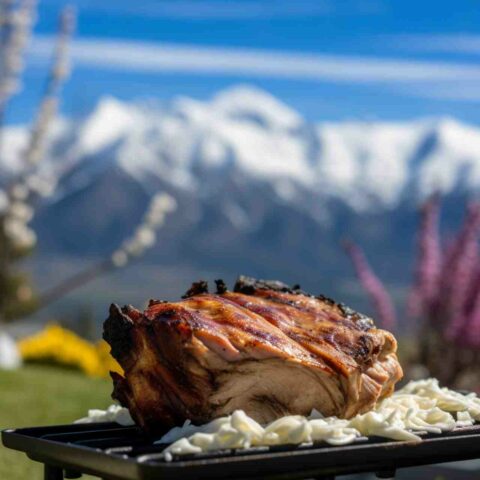
1. Slow Cooking And Smoking
As a seasoned pitmaster with numerous competition victories under my belt, I’ve come to appreciate the art of slow cooking as a tried-and-true method for creating mouthwatering pulled pork.
This low-and-slow approach not only guarantees tender, juicy meat but also allows the flavors to meld and develop, giving you that perfect balance of smokiness and tang.
The key to achieving pulled pork perfection through slow cooking lies in maintaining a consistent temperature throughout the cooking process.
Maintaining a stable temperature is crucial, as it enables the connective tissue within the pork shoulder (also known as the Boston butt) to break down slowly, transforming it into a rich taste.
I typically set my smoker or cooker at 225-250°F (107-121°C) for the ideal balance of tenderness and flavor.
An important factor in slow cooking is the choice of wood chips or chunks used to impart the desired smoky flavor.
As a pitmaster, I have experimented with various kinds of wood, such as hickory, mesquite, apple, and cherry.
My personal favorite is a mix of hickory and applewood, as it lends a robust smokiness with a subtle hint of sweetness. Feel free to mix and match woods to create your own signature flavor profile.
Don’t forget about the importance of a good dry pork rub. For a winning pulled pork, use a blend of spices that accentuates the pork’s natural flavors while adding a touch of heat and sweetness.
The Secret to Flavorful Pulled Pork: Wet Rubs and More
My go-to rub consists of brown sugar, smoked paprika, garlic powder, onion powder, cumin, and cayenne pepper. I generously apply this rub to the pork shoulder, ensuring it’s well-coated, before allowing it to rest and absorb the flavors for a few hours, or even overnight.
Another pitmaster secret is the “Texas Crutch” technique. Once the pork shoulder has reached the stall (a point when the meat’s temperature plateaus, usually around 150-170°F), I wrap it tightly in aluminum foil or unwaxed butcher paper. This helps retain moisture, speeds up the cooking process, and prevents the meat from absorbing too much smoke, which can result in a bitter taste.
In summary, the art of slow cooking pulled pork is a delicate balance of temperature control, wood selection, and well-crafted rubs. As a seasoned pitmaster, I can attest that mastering these elements will elevate your pulled pork to competition-winning heights.
Pros For Slow Cooking:
Minimal effort, tender results
Cons:
Longer cooking time, less smoky flavor
2. Grilling
This is a faster method than slow cooking and is often preferred by people who have home parties.
I find that grilling pulled pork is a delicate dance between heat management, timing, and skillful seasoning.
The key to success lies in mastering the art of indirect grilling, which allows for the slow rendering of fat and connective tissues, culminating in tender, flavorful meat with a delectable smoky crust.
To begin, it’s essential to set up your grill to be an indirect heat cooker. For charcoal grills, this means arranging the lit coals onto one side or part of the grill and put a drip tray or pan filled with water on the opposite side.
For gas grills, simply light one side of the burners and leave the other side unlit.
This indirect heat method ensures even cooking and prevents the exterior of the pork shoulder from burning before the interior has had a chance to cook through.
Maintaining a consistent temperature is crucial for grilling pulled pork.
I aim for a target range of 300-325°F (149-163°C) throughout the cooking process.
It’s important to monitor the temperature using a reliable grill thermometer and adjust the grill vents or burner settings as needed to maintain a steady heat.
To develop a rich, flavorful crust on the pork, I use a carefully crafted rub. A winning blend of spices typically includes brown sugar, smoked paprika, garlic powder, onion powder, ground cumin, and a hint of cayenne pepper for a touch of heat.
After generously applying the rub to the pork shoulder, I allow it to rest for a few hours or overnight to fully absorb the flavors.
Once your grill is set up and your pork shoulder is seasoned, it’s time to start grilling.
Place the pork on the cooler side of the grill, opposite the coals or unlit burners, and cover the grill.
To maintain that sought-after smoky flavor, add wood chips or chunks to the coals or a smoker box if using a gas grill. I prefer a mix of hickory and applewood for a robust, slightly sweet smokiness.

As the pork shoulder slowly cooks, it’s important to maintain moisture to prevent drying out. After the first couple of hours, I baste the meat with a mop sauce—a mixture of apple cider vinegar, water, and a touch of dry rub.
This adds a tangy flavor, helps develop a beautiful bark, and keeps the meat juicy.
Grilling pulled pork is a true labor of love that requires patience, skill, and a keen understanding of heat management.
By mastering these techniques and combining them with a perfect blend of spices, you’ll be well on your way to claiming the title of grill master and wowing your friends and family with your championship-worthy pulled pork.
Pros:
Faster than smoking, smoky flavor
Cons:
Requires frequent monitoring, less tender than slow cooking or smoking
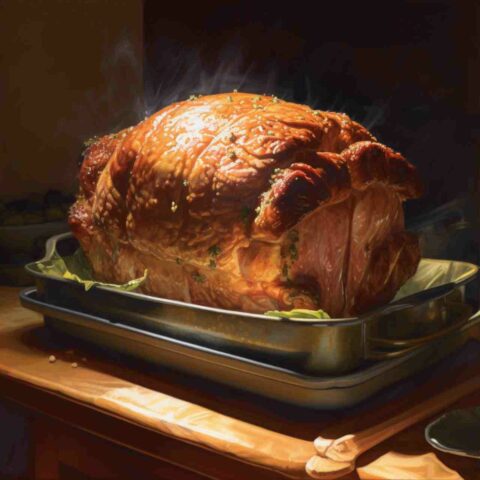
3. Oven Roasting
Oven roasting is a convenient method that doesn’t require any special equipment.
Just like Jamie Oliver, I am a firm believer that simplicity is key when it comes to creating delicious, crowd-pleasing dishes.
Oven roasting is a fantastic method for preparing pulled pork, as it requires minimal equipment, is easily accessible to home cooks, and allows the natural flavors of the pork to shine through.
The first step to making exceptional oven-roasted pulled pork is to select a quality piece of meat.
Opt for a boneless pork shoulder, also known as a pork butt, with a good amount of marbling. This marbling, or intramuscular fat, is crucial for ensuring a moist, tender result.
To create a flavorsome and aromatic crust, prepare a simple yet effective seasoning dry rub.
Combine ingredients such as brown sugar, smoked paprika, garlic powder, onion powder, ground cumin, and a touch of cayenne pepper for a little kick.
Rub the mixture generously over the entire pork shoulder, and allow it to rest for a few hours or even overnight. This will help the spices to penetrate the meat and develop a deep, rich flavor.
Preheat your oven to 300°F (149°C) and place the seasoned pork shoulder on a wire rack set inside a roasting pan.
This allows for even heat circulation and will enable any excess fat to drip away from the meat as it cooks. To retain moisture and ensure your pulled pork remains succulent, pour a small amount of liquid—such as water, apple juice, or even a mild beer—into the bottom of the roasting pan, taking care not to let it touch the meat.
As the pork roasts, keep a close eye on the liquid level in the pan, topping it up as needed to prevent the drippings from burning. Baste the pork occasionally with the pan juices to help create a beautiful, caramelized crust.
Cooking times will vary depending on the size of the pork shoulder, but a general guideline is to allow approximately 40 minutes per pound at 300°F (149°C).
A key indicator that your oven-roasted pulled pork is ready is when the internal temperature reaches between 190-205°F (88-96°C).
At this point, the collagen within the meat has broken down, resulting in tender, easy-to-shred pork. Remove the pork from the oven, tent it loosely with foil, and let it rest for about 60 minutes before shredding with two forks.
By embracing the simplicity of oven roasting and focusing on quality ingredients and flavors, you can create an unforgettable pulled pork dish that rivals even the most complex cooking methods.
Just like Jamie Oliver, you’ll be inspiring home cooks to create delicious, wholesome meals in their own kitchens.
Pros:
No special equipment required, convenient method
Cons:
Less smoky flavor, may require more frequent basting
4. Pressure Cooking
Pressure cooking is the fastest method for cooking pulled pork, making it perfect for those short on time.
How To Make Pulled Pork In a Pressure Cooker
When feeding a big group, I find that this modern, time-saving method is an excellent way to achieve succulent, tender pulled pork in a fraction of the time compared to traditional techniques.
The high-pressure environment within the Instant Pot not only accelerates the cooking process but also locks in moisture, ensuring a juicy, flavorful result.
To begin, consult the Instant Pot website for guidance on the optimal settings for pressure cooking pork. Most models, such as the Instant Pot Duo, feature a “Meat/Stew” preset, which is designed specifically for cooking meat to perfection.
However, it’s crucial to adjust the cooking time manually based on the size of your pork shoulder.
Before placing the pork shoulder into the Instant Pot, it’s essential to season it well to develop a depth of flavor.
Create a dry rub using ingredients such as brown sugar, smoked paprika, garlic powder, onion powder, ground cumin, and a touch of cayenne pepper for a bit of heat.
Generously apply the rub to the entire pork shoulder, allowing it to rest for a few hours or overnight to fully absorb the flavors.
When you’re ready to cook, set your Instant Pot to “Sauté” mode and add a small amount of oil in the stainless steel dish. Brown or sear the pork shoulder all over to create a flavorful crust.
This step is essential, as it adds an extra layer of flavor and enhances the overall dish. When the pork is nicely browned, take it out from the Instant Pot and set it aside.
Next, deglaze the Instant Pot with a liquid of your choice, such as chicken broth or apple cider vinegar, scraping up any browned bits from the bottom.
This step not only prevents the Instant Pot from displaying a “Burn” warning but also contributes to the overall flavor of the pulled pork. Place the trivet into the Instant Pot, followed by the seasoned pork shoulder on top.
Secure the lid, ensuring the steam release valve is set to “Sealing.” Select “Pressure Cook” or “Manual,” and adjust the cooking time according to the size of your pork shoulder.
A general guideline is to allow approximately 15 minutes per pound at high pressure. Once the cooking time is complete, allow a natural pressure release for best results.
After the pressure has fully released, carefully remove the pork shoulder from the Instant Pot and shred it with two forks. Mix in your favorite BBQ sauce or some of the cooking liquid for added flavor and moisture.
By harnessing the power of pressure cooking and incorporating the expert guidance provided by the Instant Pot website, you can achieve tender, mouthwatering pulled pork in a fraction of the time, impressing your friends and family with your culinary prowess.
Pros:
Fastest method, tender results
Cons:
Less smoky flavor, requires a pressure cooker
Other Less Common Methods To Make Pulled Pork for a Crowd
Ceramic Cooker or Kamado Grill:
Cooking pulled pork in a ceramic cooker or Kamado grill, such as the Big Green Egg, allows for excellent heat retention and temperature control. By using indirect heat and maintaining a low temperature, you can achieve a tender, smoky, and flavorful pulled pork.
Rotisserie:
If your grill is equipped with a rotisserie attachment, you can cook pulled pork by skewering the seasoned pork shoulder and slowly rotating it over indirect heat. This method ensures even cooking and a beautifully caramelized exterior.

Dutch Oven:
Cooking pulled pork in a Dutch oven allows you to braise the meat in a flavorful liquid, such as a mixture of barbecue sauce and beer, at a low temperature. This slow, moist cooking method results in tender, flavorful meat that can easily be shredded for pulled pork.
Caja China or Roasting Box:
A Caja China or roasting box is a large, enclosed cooking device that allows you to cook a whole hog or large cuts of meat over indirect heat from charcoal. The enclosed environment helps to retain heat and moisture, resulting in tender, juicy pulled pork with a crispy exterior.
Conclusion
Each of these methods has its unique advantages and drawbacks, so the best one for you will depend on your preferences and available equipment. Slow cooking and smoking both yield tender and flavorful pulled pork, while grilling and oven roasting provide faster options with a smoky touch. For those short on time, pressure cooking is the quickest method. No matter which method you choose, remember to adjust the cooking times according to the size of your pork and always check the internal temperature to ensure perfectly cooked, tender pulled pork that will have your guests coming back for seconds. Happy cooking!
Pulled pork is a versatile and mouthwatering dish that can be enjoyed in various forms, from pork sandwiches to tacos.
If you’ve been searching for the best ways to cook pulled pork, you’ve come to the right place. In this article, we’ll explore the top five cooking methods, complete with recipe overviews, internal temperature guidelines, and tips for adjusting cooking times based on the size of your pork.
1. Slow Cooking And Smoking
As a seasoned pitmaster with numerous competition victories under my belt, I’ve come to appreciate the art of slow cooking as a tried-and-true method for creating mouthwatering pulled pork. This low-and-slow approach not only guarantees tender, juicy meat but also allows the flavors to meld and develop, giving you that perfect balance of smokiness and tang.
The key to achieving pulled pork perfection through slow cooking lies in maintaining a consistent temperature throughout the cooking process. I typically set my smoker or cooker at 225-250°F (107-121°C) for the ideal balance of tenderness and flavor.
Maintaining a stable temperature is crucial, as it enables the connective tissue within the pork shoulder (also known as the Boston butt) to break down slowly, transforming it into rich taste.
An important factor in slow cooking is the choice of wood chips or chunks used to impart the desired smoky flavor.
As a pitmaster, I have experimented with various woods such as hickory, mesquite, apple, and cherry.
My personal favorite is a mix of hickory and applewood, as it lends a robust smokiness with a subtle hint of sweetness. Feel free to mix and match woods to create your own signature flavor profile.
Don’t forget about the importance of a good dry pork rub. For a winning pulled pork, use a blend of spices that accentuates the pork’s natural flavors while adding a touch of heat and sweetness.
My go-to rub consists of brown sugar, smoked paprika, garlic powder, onion powder, cumin, and cayenne pepper. I generously apply this rub to the pork shoulder, ensuring it’s well-coated, before allowing it to rest and absorb the flavors for a few hours, or even overnight.
Another pitmaster secret is the “Texas Crutch” technique. Once the pork shoulder has reached the stall (a point when the meat’s temperature plateaus, usually around 150-170°F), I wrap it tightly in aluminum foil or unwaxed butcher paper. This helps retain moisture, speeds up the cooking process, and prevents the meat from absorbing too much smoke, which can result in a bitter taste.
In summary, the art of slow cooking pulled pork is a delicate balance of temperature control, wood selection, and well-crafted rubs. As a seasoned pitmaster, I can attest that mastering these elements will elevate your pulled pork to competition-winning heights.
Pros For Slow Cooking:
Minimal effort, tender results
Cons:
Longer cooking time, less smoky flavor
2. Grilling
This is a faster method than slow cooking and is often preferred by people who have home parties.
I find that grilling pulled pork is a delicate dance between heat management, timing, and skillful seasoning.
The key to success lies in mastering the art of indirect grilling, which allows for the slow rendering of fat and connective tissues, culminating in tender, flavorful meat with a delectable smoky crust.
To begin, it’s essential to set up your grill to be an indirect heat cooker. For charcoal grills, this means arranging the lit coals onto one side or part of the grill and put a drip tray or pan filled with water on the opposite side.
For gas grills, simply light one side of the burners and leave the other side unlit. This indirect heat method ensures even cooking and prevents the exterior of the pork shoulder from burning before the interior has had a chance to cook through.
Maintaining a consistent temperature is crucial for grilling pulled pork. I aim for a target range of 300-325°F (149-163°C) throughout the cooking process. It’s important to monitor the temperature using a reliable grill thermometer and adjust the grill vents or burner settings as needed to maintain a steady heat.
To develop a rich, flavorful crust on the pork, I use a carefully crafted rub. A winning blend of spices typically includes brown sugar, smoked paprika, garlic powder, onion powder, ground cumin, and a hint of cayenne pepper for a touch of heat.
After generously applying the rub to the pork shoulder, I allow it to rest for a few hours or overnight to fully absorb the flavors.
Once your grill is set up and your pork shoulder is seasoned, it’s time to start grilling.
Place the pork on the cooler side of the grill, opposite the coals or unlit burners, and cover the grill.
To maintain that sought-after smoky flavor, add wood chips or chunks to the coals or a smoker box if using a gas grill. I prefer a mix of hickory and applewood for a robust, slightly sweet smokiness.
As the pork shoulder slowly cooks, it’s important to maintain moisture to prevent drying out. After the first couple of hours, I baste the meat with a mop sauce—a mixture of apple cider vinegar, water, and a touch of dry rub.
This adds a tangy flavor, helps develop a beautiful bark, and keeps the meat juicy.
Grilling pulled pork is a true labor of love that requires patience, skill, and a keen understanding of heat management.
By mastering these techniques and combining them with a perfect blend of spices, you’ll be well on your way to claiming the title of grill master and wowing your friends and family with your championship-worthy pulled pork.
Pros:
Faster than smoking, smoky flavor
Cons:
Requires frequent monitoring, less tender than slow cooking or smoking
3. Oven Roasting
Oven roasting is a convenient method that doesn’t require any special equipment.
Just like Jamie Oliver, I am a firm believer that simplicity is key when it comes to creating delicious, crowd-pleasing dishes.
Oven roasting is a fantastic method for preparing pulled pork, as it requires minimal equipment, is easily accessible to home cooks, and allows the natural flavors of the pork to shine through.
The first step to making exceptional oven-roasted pulled pork is to select a quality piece of meat. Opt for a boneless pork shoulder, also known as a pork butt, with a good amount of marbling. This marbling, or intramuscular fat, is crucial for ensuring a moist, tender result.
To create a flavorsome and aromatic crust, prepare a simple yet effective seasoning dry rub.
Combine ingredients such as brown sugar, smoked paprika, garlic powder, onion powder, ground cumin, and a touch of cayenne pepper for a little kick.
Rub the mixture generously over the entire pork shoulder, and allow it to rest for a few hours or even overnight. This will help the spices to penetrate the meat and develop a deep, rich flavor.
Preheat your oven to 300°F (149°C) and place the seasoned pork shoulder on a wire rack set inside a roasting pan.
This allows for even heat circulation and will enable any excess fat to drip away from the meat as it cooks. To retain moisture and ensure your pulled pork remains succulent, pour a small amount of liquid—such as water, apple juice, or even a mild beer—into the bottom of the roasting pan, taking care not to let it touch the meat.
As the pork roasts, keep a close eye on the liquid level in the pan, topping it up as needed to prevent the drippings from burning. Baste the pork occasionally with the pan juices to help create a beautiful, caramelized crust.
Cooking times will vary depending on the size of the pork shoulder, but a general guideline is to allow approximately 40 minutes per pound at 300°F (149°C).
A key indicator that your oven-roasted pulled pork is ready is when the internal temperature reaches between 190-205°F (88-96°C).
At this point, the collagen within the meat has broken down, resulting in tender, easy-to-shred pork. Remove the pork from the oven, tent it loosely with foil, and let it rest for about 60 minutes before shredding with two forks.
By embracing the simplicity of oven roasting and focusing on quality ingredients and flavors, you can create an unforgettable pulled pork dish that rivals even the most complex cooking methods.
Just like Jamie Oliver, you’ll be inspiring home cooks to create delicious, wholesome meals in their own kitchens.
Pros:
No special equipment required, convenient method
Cons:
Less smoky flavor, may require more frequent basting
4. Pressure Cooking
Pressure cooking is the fastest method for cooking pulled pork, making it perfect for those short on time.
When feeding a big group, I find that this modern, time-saving method is an excellent way to achieve succulent, tender pulled pork in a fraction of the time compared to traditional techniques.
The high-pressure environment within the Instant Pot not only accelerates the cooking process but also locks in moisture, ensuring a juicy, flavorful result.
To begin, consult the Instant Pot website for guidance on the optimal settings for pressure cooking pork. Most models, such as the Instant Pot Duo, feature a “Meat/Stew” preset, which is designed specifically for cooking meat to perfection.
However, it’s crucial to adjust the cooking time manually based on the size of your pork shoulder.
Before placing the pork shoulder into the Instant Pot, it’s essential to season it well to develop a depth of flavor.
Create a dry rub using ingredients such as brown sugar, smoked paprika, garlic powder, onion powder, ground cumin, and a touch of cayenne pepper for a bit of heat.
Generously apply the rub to the entire pork shoulder, allowing it to rest for a few hours or overnight to fully absorb the flavors.
When you’re ready to cook, set your Instant Pot to “Sauté” mode and add a small amount of oil in the stainless steel dish. Brown or sear the pork shoulder all over to create a flavorful crust.
This step is essential, as it adds an extra layer of flavor and enhances the overall dish. When the pork is nicely browned, take it out from the Instant Pot and set it aside.
Next, deglaze the Instant Pot with a liquid of your choice, such as chicken broth or apple cider vinegar, scraping up any browned bits from the bottom.
This step not only prevents the Instant Pot from displaying a “Burn” warning but also contributes to the overall flavor of the pulled pork. Place the trivet into the Instant Pot, followed by the seasoned pork shoulder on top.
Secure the lid, ensuring the steam release valve is set to “Sealing.” Select “Pressure Cook” or “Manual,” and adjust the cooking time according to the size of your pork shoulder.
A general guideline is to allow approximately 15 minutes per pound at high pressure. Once the cooking time is complete, allow a natural pressure release for best results.
After the pressure has fully released, carefully remove the pork shoulder from the Instant Pot and shred it with two forks. Mix in your favorite BBQ sauce or some of the cooking liquid for added flavor and moisture.
By harnessing the power of pressure cooking and incorporating the expert guidance provided by the Instant Pot website, you can achieve tender, mouthwatering pulled pork in a fraction of the time, impressing your friends and family with your culinary prowess.
Pros:
Fastest method, tender results
Cons:
Less smoky flavor, requires a pressure cooker
Other Less Common Methods To Make Pulled Pork for a Crowd
- Sous Vide: This method involves vacuum-sealing the seasoned pork shoulder in a plastic bag and immersing it in a temperature-controlled water bath. Sous vide cooking allows for precise temperature control, ensuring perfectly cooked and tender pulled pork. After the sous vide cooking process, you can finish the pork by searing it briefly on a hot grill or pan to develop a flavorful crust.
- Ceramic Cooker or Kamado Grill: Cooking pulled pork in a ceramic cooker or Kamado grill, such as the Big Green Egg, allows for excellent heat retention and temperature control. By using indirect heat and maintaining a low temperature, you can achieve a tender, smoky, and flavorful pulled pork.
- Rotisserie: If your grill is equipped with a rotisserie attachment, you can cook pulled pork by skewering the seasoned pork shoulder and slowly rotating it over indirect heat. This method ensures even cooking and a beautifully caramelized exterior.
- Dutch Oven: Cooking pulled pork in a Dutch oven allows you to braise the meat in a flavorful liquid, such as a mixture of barbecue sauce and beer, at a low temperature. This slow, moist cooking method results in tender, flavorful meat that can easily be shredded for pulled pork.
- Caja China or Roasting Box: A Caja China or roasting box is a large, enclosed cooking device that allows you to cook a whole hog or large cuts of meat over indirect heat from charcoal. The enclosed environment helps to retain heat and moisture, resulting in tender, juicy pulled pork with a crispy exterior.
Conclusion
Each of these methods has its unique advantages and drawbacks, so the best one for you will depend on your preferences and available equipment. Slow cooking and smoking both yield tender and flavorful pulled pork, while grilling and oven roasting provide faster options with a smoky touch. For those short on time, pressure cooking is the quickest method. No matter which method you choose, remember to adjust the cooking times according to the size of your pork and always check the internal temperature to ensure perfectly cooked, tender pulled pork that will have your guests coming back for seconds. Happy cooking!